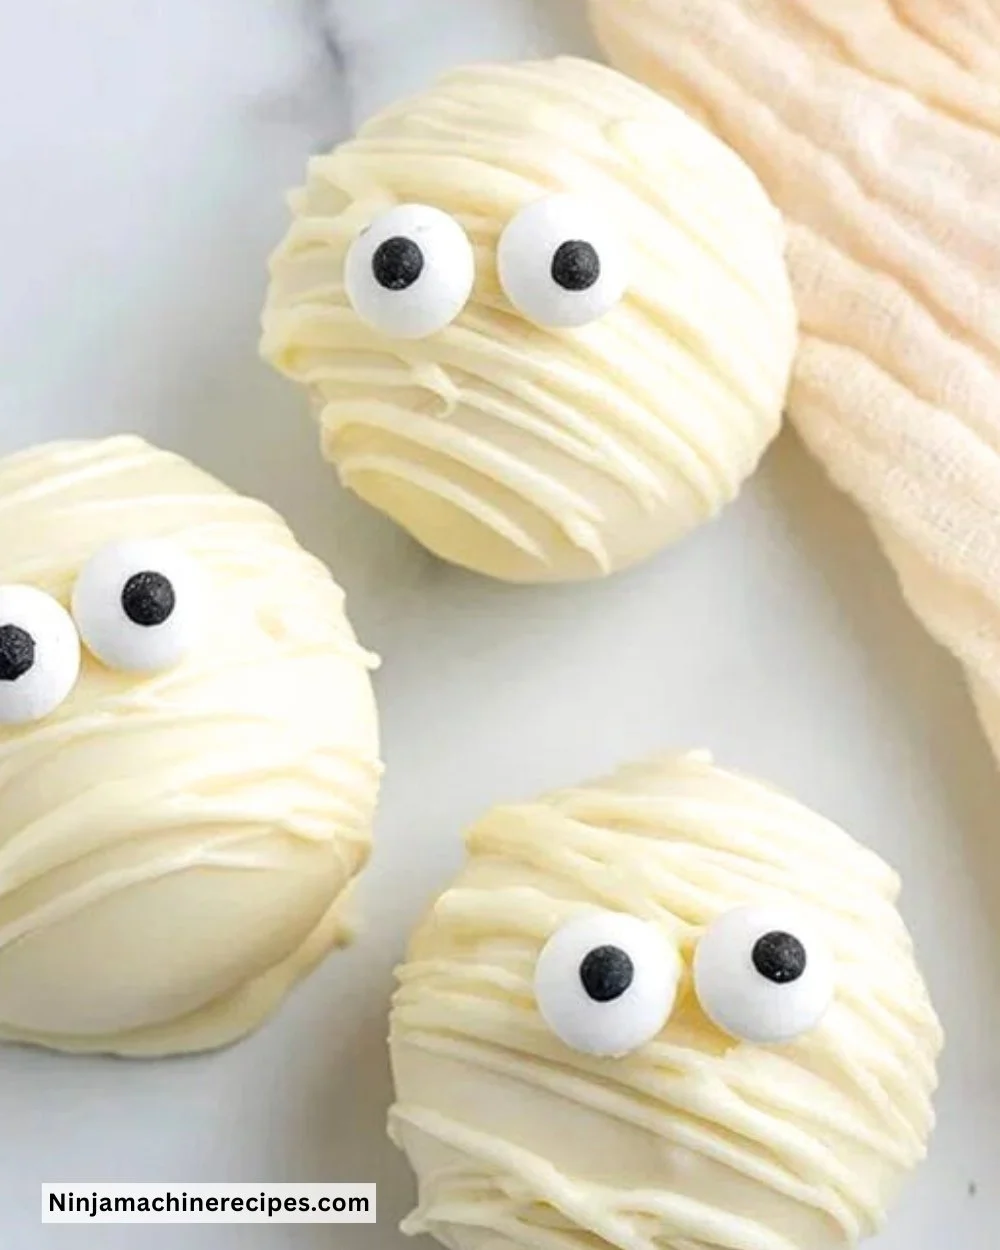
Mummy Oreo Balls are a delightful treat that combines the rich flavor of Oreos with creamy cheesecake and a fun Halloween twist. These no-bake goodies are perfect for parties, a spooky movie night, or just because you want something sweet and fun! With their spooky mummy appearance and delicious taste, they are sure to be a hit among kids and adults alike. Let’s dive into making these delicious, festive treats!
Recipe Information
- Prep Time: 40 minutes
- Cook Time: 0 minutes
- Total Time: 40 minutes
- Servings: 24 balls
- Difficulty Level: Easy
Nutrition Information
- Calories per serving: 150
- Protein: 2g
- Carbohydrates: 17g
- Fat: 8g
- Fiber: 1g
- Sugar: 9g
- Sodium: 50mg
Why Make This Mummy Oreo Balls
Mummy Oreo Balls are more than just treats; they are a fun way to get creative in the kitchen. With just a handful of ingredients, they come together quickly and provide a festive touch to any Halloween gathering. They are incredibly easy to make, require no baking, and the kids will love helping to decorate these spooky delights. Their creamy texture, crunchy exterior, and playful mummy design will bring smiles all around.
How to Make Mummy Oreo Balls
Ingredients:
- 1 package Oreo cookies
- 8 oz cream cheese, softened
- White chocolate or candy melts
- Black icing or chocolate for decorating
Directions:
Step 1: Preparation
Crush the Oreo cookies in a food processor until fine crumbs form. This will give your Oreo balls the deliciously rich chocolate base.
Step 2: Mixing
In a bowl, mix the crushed Oreos with the softened cream cheese until well combined. Make sure the mixture is smooth and creamy.
Step 3: Shaping
Roll the mixture into small balls and place them on a baking sheet. Keep them evenly sized for uniform presentation and easy serving.
Step 4: Freezing
Freeze for about 30 minutes until firm. This will help the balls hold their shape when coating them in chocolate.
Step 5: Melting Chocolate
Melt the white chocolate or candy melts in a microwave or double boiler. Use short intervals in the microwave, stirring in between to ensure it melts smoothly without burning.
Step 6: Coating
Dip each ball into the melted chocolate, ensuring they are fully coated, and place them back on the baking sheet. Let the excess chocolate drip off before placing them down.
Step 7: Decorating
Use black icing or melted chocolate to draw ‘eyes’ on the balls to resemble mummies. Get creative and whimsical with the designs!
Step 8: Setting
Allow to set before serving. This will ensure the chocolate hardens and keeps the cute mummy features intact.
How to Serve Mummy Oreo Balls
These treats are perfect for any Halloween celebration, spooky parties, or just a fun surprise for the kids. Arrange them on a festive platter for an eye-catching dessert table, and don’t forget to have fun with the decorations!
How to Store Mummy Oreo Balls
Store Mummy Oreo Balls in an airtight container in the refrigerator for up to one week. If you want to keep them even longer, consider freezing them for up to a month. Just allow them to thaw in the fridge before serving.
Expert Tips for Perfect Mummy Oreo Balls
- For an easier way to shape the balls, use a cookie scoop to ensure they are all the same size.
- If you don’t have black icing, you can use melted dark chocolate or even mini chocolate chips for the eyes.
- Feel free to use different flavored Oreo cookies like mint or peanut butter for a fun twist on the flavors!
Delicious Variations
- Pumpkin Spice Mummy Balls: Add pumpkin spice to the cream cheese mixture for a seasonal flavor.
- Nutty Surprise: Add crushed nuts or nut butter to the filling for a delightful crunch.
- Candy Coating: Use colored candy melts for a vibrant twist on the coating!
Frequently Asked Questions
-
Can I use low-fat cream cheese?
Yes, low-fat cream cheese can be used, but it may affect the creaminess of the filling. -
How can I make these even quicker?
You can use store-bought cake pops instead of making the filling from scratch. -
Is there a dairy-free option?
You can use dairy-free cream cheese and vegan chocolate to make these treats dairy-free. -
Why are my chocolate-coated balls melting?
Ensure the balls are completely chilled before dipping, as warm balls can cause the chocolate coating to melt. -
Can I decorate these ahead of time?
Yes, you can make and decorate the balls a day in advance, just store them properly in the fridge.
Conclusion
Mummy Oreo Balls are a delightfully fun and easy treat to prepare, perfect for any Halloween festivity or a simple family dessert. With their creamy Oreo filling, festive appearance, and simple preparation, these spooky snacks will surely be a hit. Gather the ingredients, invite the kids to help, and get ready to create some delicious fun in the kitchen. Enjoy a spooky, sweet treat that everyone will love!
Print
Mummy Oreo Balls
- Total Time: 40 minutes
- Yield: 24 balls 1x
- Diet: Vegetarian
Description
Delightful no-bake Oreo balls with a creamy cheesecake center, perfect for Halloween celebrations.
Ingredients
- 1 package Oreo cookies
- 8 oz cream cheese, softened
- White chocolate or candy melts
- Black icing or chocolate for decorating
Instructions
- Crush the Oreo cookies in a food processor until fine crumbs form.
- Mix the crushed Oreos with the softened cream cheese until well combined.
- Roll the mixture into small balls and place them on a baking sheet.
- Freeze for about 30 minutes until firm.
- Melt the white chocolate or candy melts in a microwave or double boiler.
- Dip each ball into the melted chocolate, ensuring they are fully coated.
- Use black icing or melted chocolate to draw ‘eyes’ on the balls.
- Allow to set before serving.
Notes
Store in an airtight container in the refrigerator for up to one week.
- Prep Time: 40 minutes
- Cook Time: 0 minutes
- Category: Dessert
- Method: No-Bake
- Cuisine: American
Nutrition
- Serving Size: 1 ball
- Calories: 150
- Sugar: 9g
- Sodium: 50mg
- Fat: 8g
- Saturated Fat: 5g
- Unsaturated Fat: 3g
- Trans Fat: 0g
- Carbohydrates: 17g
- Fiber: 1g
- Protein: 2g
- Cholesterol: 20mg