No-Bulk-Fermentation Sourdough Bread is an exciting recipe that allows you to enjoy the delightful taste and texture of homemade sourdough without the long wait typically associated with the bulk fermentation process. This method keeps things simple while still delivering a crusty, flavorful loaf that you will be proud to serve at your table.
Recipe Information
- Prep Time: 30 minutes
- Cook Time: 45-50 minutes
- Total Time: 1 hour 20-30 minutes
- Servings: 1 loaf (approximately 8 slices)
- Difficulty Level: Medium
Nutrition Information
- Calories per serving: 150
- Protein: 4 grams
- Carbohydrates: 30 grams
- Fat: 1 gram
- Fiber: 1 gram
- Sugar: 0 grams
- Sodium: 160 mg
Why Make This No-Bulk-Fermentation Sourdough Bread
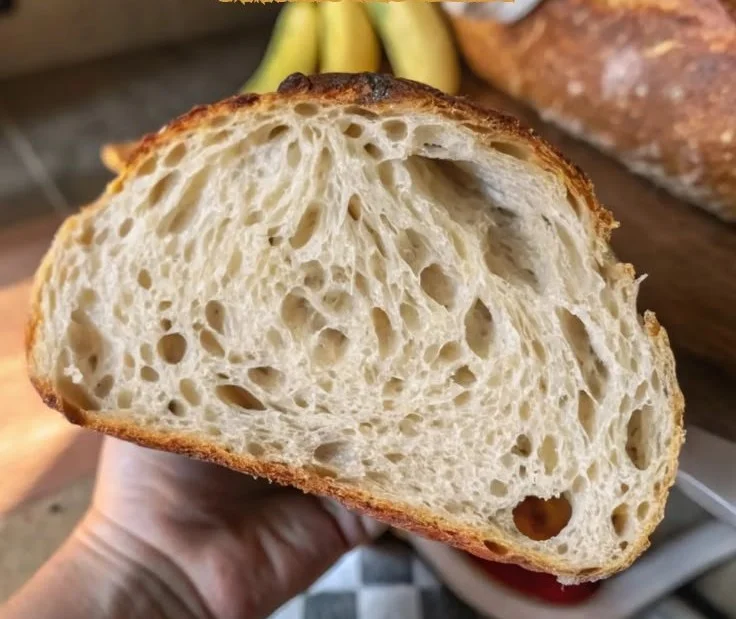
This No-Bulk-Fermentation Sourdough Bread offers a perfect balance of convenience and flavor. It combines the tangy essence of traditional sourdough with a quicker approach that fits into a busy lifestyle. You’ll end up with a loaf that boasts a crispy crust and a chewy crumb—ideal for sandwiches, toast, or simply slathered with butter. This method is particularly wonderful for beginners eager to dive into sourdough baking without feeling overwhelmed by extended fermentation times.
How to Make No-Bulk-Fermentation Sourdough Bread
The process to create this divine bread is straightforward and rewarding. Follow these steps closely to achieve that artisan quality you often find in bakeries.
Ingredients:
- 3 cups all-purpose flour
- 1 1/2 cups water
- 1/2 cup sourdough starter (active)
- 1 teaspoon salt
Directions:
Step 1: Preparation
In a large bowl, mix together the flour and salt. This simple step ensures that the salt is evenly distributed throughout the flour, enhancing the flavor of your bread.
Step 2: Mixing
In another bowl, combine the water and sourdough starter, then pour this mixture into the flour. Mix until a shaggy dough forms. Don’t worry if it looks a little rough; that’s perfectly normal!
Step 3: Resting
Let the dough rest for 30 minutes. This resting period helps the flour absorb the water and makes the dough easier to handle later on.
Step 4: Stretching and Folding
After resting, stretch and fold the dough for a few minutes until it becomes smoother. This technique helps develop gluten, which is vital for the bread’s structure.
Step 5: Shaping
Transfer the dough to a lightly floured surface and shape it into a ball. The dough should feel elastic and a little tacky.
Step 6: Proofing
Place the shaped dough seam-side down into a floured proofing basket. Cover and let it rise for 1-2 hours at room temperature. You want it to puff up nicely and feel airy.
Step 7: Preheating
Preheat your oven to 450°F (230°C) with a Dutch oven inside. This ensures that the bread gets a good steam burst when added to the hot pot, creating that lovely crust.
Step 8: Baking
Once heated, carefully transfer the dough into the Dutch oven. Cover and bake for 30 minutes. Then remove the lid and bake for another 15-20 minutes until golden brown. Enjoy the delightful aroma filling your kitchen!
Step 9: Cooling
Allow the bread to cool before slicing. This resting time is crucial; cutting too soon might give you a gummy texture inside the loaf.
How to Serve No-Bulk-Fermentation Sourdough Bread
Slice this bread thick for sandwiches, or serve it toasted with a drizzle of olive oil and a sprinkle of sea salt as a tasty appetizer. Pair it with homemade soups or stews to soak up all the delicious flavors, or use it to create elegant bruschetta topped with fresh tomatoes and basil.
How to Store No-Bulk-Fermentation Sourdough Bread
Store your bread wrapped in a clean kitchen towel at room temperature for up to 3 days. For longer storage, place it in a plastic bag in the freezer for up to 3 months. Just remember to slice it beforehand for easy defrosting!
Expert Tips for Perfect No-Bulk-Fermentation Sourdough Bread
- Make sure your sourdough starter is active and bubbly for best results.
- If you want a milder flavor, you can use half all-purpose flour and half whole wheat flour.
- Experiment with different add-ins like herbs or nuts to customize your bread.
- Keep an eye on your bread during the last few minutes of baking, as oven temperatures can vary.
Delicious Variations
- Herb Infused: Add dried herbs like rosemary or thyme to the dough for a fragrant twist.
- Cheese Lover’s: Fold in shredded cheese like cheddar or parmesan for a savory bite.
- Sweet Twist: Incorporate dried fruits such as cranberries or raisins for a hearty breakfast bread.
Frequently Asked Questions
-
Can I use whole wheat flour instead of all-purpose flour?
Yes! Using whole wheat flour will give your loaf a denser texture and earthier flavor. Just be sure to adjust the water content as whole wheat absorbs more moisture. -
What can I do if my dough is too sticky?
If the dough is too sticky to handle, sprinkle in a little more flour while you’re shaping. Be careful not to overdo it, as this can make your bread dry. -
How do I know when the bread is done baking?
The bread should be a golden brown color on top, and it will sound hollow when tapped on the bottom. An internal temperature of around 200°F (93°C) also indicates doneness. -
Is it necessary to use a Dutch oven?
While a Dutch oven is great for creating steam, you can bake it on a baking sheet. Just place a pan of water in the bottom of the oven to generate steam. -
Can I use a different type of starter?
Yes, if you have a different kind of sourdough starter, feel free to use it. Just make sure it’s active and at its peak of fermentation.
Conclusion
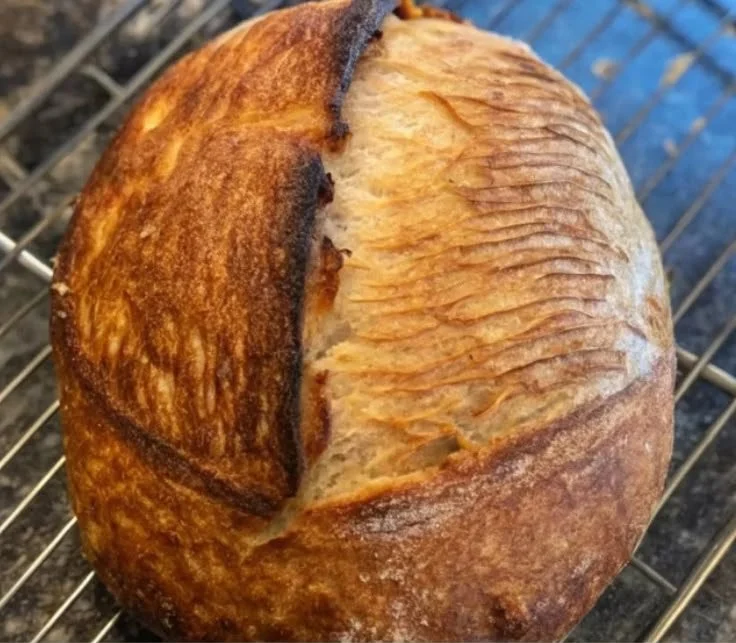
With this No-Bulk-Fermentation Sourdough Bread recipe, you can embrace the delightful world of sourdough baking without the wait. Follow these simple steps, and you’ll enjoy a beautiful loaf with a wonderful crust and a soft, airy crumb. Don’t be afraid to experiment with different flavors and serving styles. Happy baking!
Print
No-Bulk-Fermentation Sourdough Bread
- Total Time: 80 minutes
- Yield: 1 loaf (approximately 8 slices) 1x
- Diet: Vegetarian
Description
Enjoy the delightful taste and texture of homemade sourdough without the long wait typically associated with bulk fermentation.
Ingredients
- 3 cups all-purpose flour
- 1 1/2 cups water
- 1/2 cup sourdough starter (active)
- 1 teaspoon salt
Instructions
- PrepareIn a large bowl, mix together the flour and salt to ensure even distribution.
- Combine the water and sourdough starter in another bowl, then pour into the flour. Mix until a shaggy dough forms.
- Let the dough rest for 30 minutes to allow the flour to absorb water.
- Stretch and fold the dough for a few minutes until it becomes smoother.
- Transfer the dough to a lightly floured surface and shape it into a ball.
- Place the shaped dough seam-side down into a floured proofing basket. Cover and let it rise for 1-2 hours.
- Preheat your oven to 450°F (230°C) with a Dutch oven inside.
- Carefully transfer the dough into the Dutch oven. Cover and bake for 30 minutes, then remove the lid and bake for an additional 15-20 minutes until golden brown.
- Allow the bread to cool before slicing for the best texture.
Notes
For best results, ensure your sourdough starter is active. Experiment with different add-ins like herbs or nuts for customized flavors.
- Prep Time: 30 minutes
- Cook Time: 50 minutes
- Category: Bread
- Method: Baking
- Cuisine: Baking
Nutrition
- Serving Size: 1 slice
- Calories: 150
- Sugar: 0g
- Sodium: 160mg
- Fat: 1g
- Saturated Fat: 0g
- Unsaturated Fat: 0g
- Trans Fat: 0g
- Carbohydrates: 30g
- Fiber: 1g
- Protein: 4g
- Cholesterol: 0mg