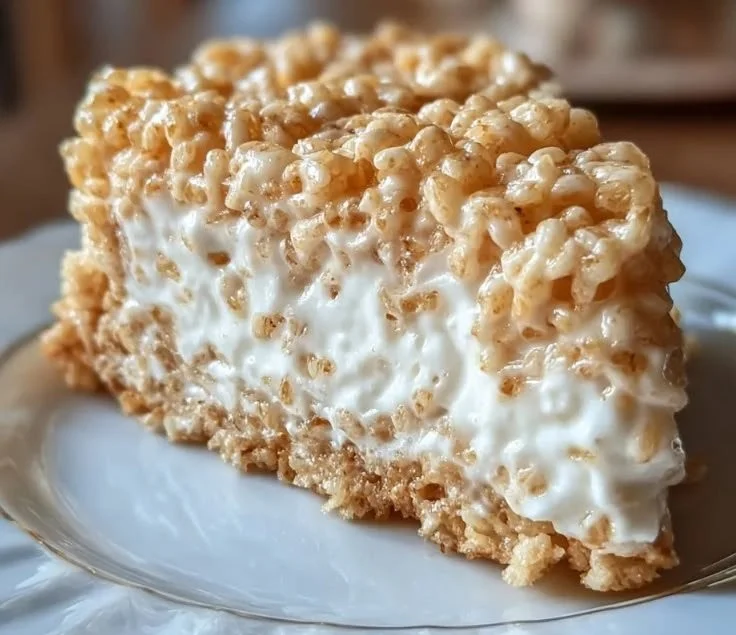
Rice Krispy Treat No-Bake Cheesecake combines the beloved flavors of classic Rice Krispy treats with the creamy richness of cheesecake for a delightful dessert that is as easy to make as it is delicious. Perfect for gatherings, celebrations, or just a sweet treat at home, this no-bake cheesecake will impress your family and friends without requiring hours in the kitchen.
Recipe Information
- Prep Time: 20 minutes
- Cook Time: 10 minutes
- Total Time: 4 hours 30 minutes
- Servings: 8
- Difficulty Level: Easy
Nutrition Information
- Calories per serving: 350
- Protein: 4 grams
- Carbohydrates: 42 grams
- Fat: 19 grams
- Fiber: 1 gram
- Sugar: 18 grams
- Sodium: 150 mg
Why Make This Rice Krispy Treat No-Bake Cheesecake
This Rice Krispy Treat No-Bake Cheesecake is a fantastic dessert option for those who want something sweet without the need for baking. It offers a unique texture that balances the crispy crunch of Rice Krispies with the creamy smoothness of cheesecake. The flavor profile is a playful mix of buttery sweetness from the Rice Krispies and the luscious tanginess of cream cheese. It’s perfect for summer, birthday parties, or whenever you’re in the mood for a light yet satisfying treat!
How to Make Rice Krispy Treat No-Bake Cheesecake
Creating this delectable cheesecake is simple and straightforward. Follow these steps for a dessert that is sure to impress!
Ingredients:
- 4 cups Rice Krispies cereal
- 1 cup mini marshmallows
- 1/4 cup unsalted butter
- 1 package (8 oz) cream cheese, softened
- 1 cup powdered sugar
- 1 cup heavy cream
- 1 teaspoon vanilla extract
Directions:
-
Step 1: Melting the Base
In a saucepan over low heat, melt the butter and mini marshmallows together, stirring until the mixture is smooth and completely combined.
-
Step 2: Coating the Cereal
Remove the saucepan from heat and stir in the Rice Krispies cereal until they are evenly coated with the marshmallow mixture.
-
Step 3: Layering the Bottom
Press half of the Rice Krispy mixture into the bottom of a 9-inch springform pan to form a firm base.
-
Step 4: Preparing the Cream Cheese Mixture
In a mixing bowl, beat the softened cream cheese until it’s smooth and creamy. Gradually add the powdered sugar, mixing until well combined.
-
Step 5: Whipping the Cream
In another bowl, whip the heavy cream and vanilla extract until stiff peaks form. This will give your cheesecake a light and airy texture.
-
Step 6: Combining Mixtures
Fold the whipped cream into the cream cheese mixture gently until the mixture is combined and smooth.
-
Step 7: Assembling the Cheesecake
Spread the cream cheese mixture evenly over the Rice Krispy layer in the pan.
-
Step 8: Finishing Touches
Top the cheesecake with the remaining Rice Krispy mixture, pressing down gently to create an even layer on top.
-
Step 9: Chilling
Refrigerate the assembled cheesecake for at least 4 hours or until it’s fully set and firm.
-
Step 10: Serving
Once set, remove the cheesecake from the springform pan and slice it into wedges for serving.
How to Serve Rice Krispy Treat No-Bake Cheesecake
This cheesecake is delightful on its own, but you can enhance its appeal by garnishing with fresh berries, chocolate drizzles, or a dollop of whipped cream. Serve it chilled for a refreshing dessert that balances sweetness with a hint of tanginess.
How to Store Rice Krispy Treat No-Bake Cheesecake
Store any leftovers in an airtight container in the refrigerator for up to 5 days. If you need to keep it longer, you can freeze the cheesecake for up to 2 months. Just make sure it’s wrapped securely to avoid freezer burn, and thaw it in the fridge before serving.
Expert Tips for Perfect Rice Krispy Treat No-Bake Cheesecake
- Always use fresh ingredients for the best flavor.
- Be patient when pressing the Rice Krispy layer into the pan; ensure it’s tightly packed for stability.
- For extra flavor, consider adding a splash of lemon juice to the cream cheese mixture for a nice citrus kick.
- If you prefer a lighter version, you can substitute light cream cheese and reduced-fat whipped topping.
Delicious Variations
- Chocolate Lovers: Add cocoa powder to the cream cheese mixture or mix in chocolate chips for a chocolate-flavored cheesecake.
- Fruit-Infused: Swirl in fruit preserves or pureed fruit into the cream cheese layer before chilling for a fruity twist.
- Nutty Crunch: Mix chopped nuts into the Rice Krispy layer for added texture and flavor.
Frequently Asked Questions
-
Can I use regular marshmallows instead of mini marshmallows?
Yes, regular marshmallows can be used. Just adjust the melting time slightly as they may take a bit longer to melt. -
Is it necessary to refrigerate the cheesecake before serving?
Yes, chilling is essential for the cheesecake to set properly and achieve the right texture. -
Can I make this cheesecake gluten-free?
Yes, ensure that you use gluten-free Rice Krispies to suit gluten-sensitive diets. -
What can I substitute for heavy cream?
You can use whipped topping for a lighter option, but this may alter the texture slightly. -
How can I avoid my cheesecake collapsing after setting?
Ensure you incorporate the whipped cream gently and allow it to chill long enough. Pressing the Rice Krispy mixture firmly also helps maintain structure.
Conclusion
This Rice Krispy Treat No-Bake Cheesecake is an irresistible blend of nostalgia and indulgence. Its simple preparation and delightful flavors make it a perfect choice for any occasion. Whether you’re serving it at a party or enjoying it for a personal treat, it’s sure to be a hit. So grab your ingredients and start creating this amazing cheesecake that everyone will love!
Print
Rice Krispy Treat No-Bake Cheesecake
- Total Time: 270 minutes
- Yield: 8 servings 1x
- Diet: Vegetarian
Description
A delightful dessert that combines the beloved flavors of classic Rice Krispy treats with creamy cheesecake, perfect for gatherings and celebrations.
Ingredients
- 4 cups Rice Krispies cereal
- 1 cup mini marshmallows
- 1/4 cup unsalted butter
- 1 package (8 oz) cream cheese, softened
- 1 cup powdered sugar
- 1 cup heavy cream
- 1 teaspoon vanilla extract
Instructions
- In a saucepan over low heat, melt the butter and mini marshmallows together, stirring until the mixture is smooth and completely combined.
- Remove the saucepan from heat and stir in the Rice Krispies cereal until they are evenly coated with the marshmallow mixture.
- Press half of the Rice Krispy mixture into the bottom of a 9-inch springform pan to form a firm base.
- In a mixing bowl, beat the softened cream cheese until it’s smooth and creamy. Gradually add the powdered sugar, mixing until well combined.
- In another bowl, whip the heavy cream and vanilla extract until stiff peaks form.
- Fold the whipped cream into the cream cheese mixture gently until the mixture is combined and smooth.
- Spread the cream cheese mixture evenly over the Rice Krispy layer in the pan.
- Top the cheesecake with the remaining Rice Krispy mixture, pressing down gently to create an even layer on top.
- Refrigerate the assembled cheesecake for at least 4 hours or until it’s fully set and firm.
- Once set, remove the cheesecake from the springform pan and slice it into wedges for serving.
Notes
Serve chilled. Can be garnished with fresh berries or chocolate drizzles.
- Prep Time: 20 minutes
- Cook Time: 10 minutes
- Category: Dessert
- Method: No-Bake
- Cuisine: American
Nutrition
- Serving Size: 1 serving
- Calories: 350
- Sugar: 18g
- Sodium: 150mg
- Fat: 19g
- Saturated Fat: 11g
- Unsaturated Fat: 6g
- Trans Fat: 0g
- Carbohydrates: 42g
- Fiber: 1g
- Protein: 4g
- Cholesterol: 30mg