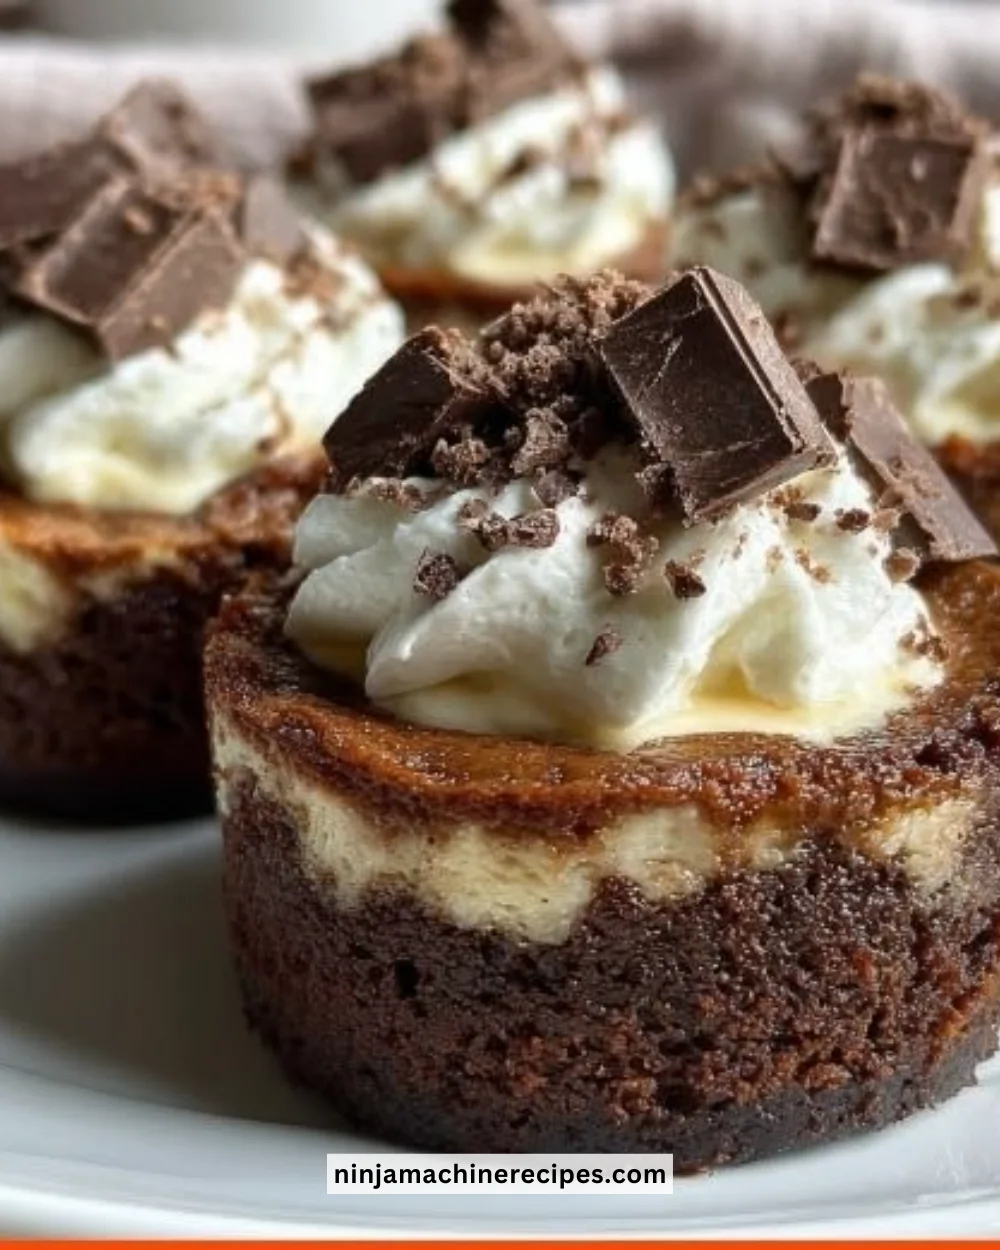
Brownie Bottom Mini Cheesecakes combine the rich chocolate fudge of brownies with the velvety smoothness of cheesecake for a delightful dessert experience. These delightful treats are perfect for sharing during gatherings or enjoying as a sweet indulgence at home. With a simple preparation and gorgeous presentation, they are bound to impress anyone with a sweet tooth!
Recipe Information
- Prep Time: 40 minutes
- Cook Time: 25–30 minutes
- Total Time: 1 hour 5 minutes
- Servings: 12 mini cheesecakes
- Difficulty Level: Medium
Nutrition Information
- Calories per serving: 300
- Protein: 5g
- Carbohydrates: 34g
- Fat: 17g
- Fiber: 1g
- Sugar: 20g
- Sodium: 180mg
Why Make This Brownie Bottom Mini Cheesecakes
Brownie Bottom Mini Cheesecakes are not only a feast for the eyes but also a delight for the taste buds. With a base that’s soft, chewy, and chocolatey, topped with a creamy cheesecake layer, they deliver two satisfying desserts in one delicious bite. Perfectly portioned for both kids and adults, these mini cheesecakes can be customized with various toppings, making them ideal for any occasion, from birthday parties to casual family dinners.
How to Make Brownie Bottom Mini Cheesecakes
Ingredients:
For the brownie base:
- 1/2 cup (115 g) unsalted butter, melted and slightly cooled
- 1 cup (200 g) granulated sugar
- 2 large eggs, at room temperature
- 1 teaspoon pure vanilla extract
- 1/3 cup (40 g) unsweetened cocoa powder
- 1/2 cup (65 g) all-purpose flour
- 1/4 teaspoon baking powder
- 1/4 teaspoon fine sea salt or table salt
- 1/2 cup (90 g) semisweet chocolate chips or chunks (optional, for extra fudginess)
For the cheesecake filling:
- 16 oz (450 g) cream cheese, brick-style, softened to room temperature
- 1/2 cup (100 g) granulated sugar
- 1/4 cup (60 ml) sour cream, at room temperature
- 1 teaspoon pure vanilla extract
- 2 large eggs, at room temperature
- 1 tablespoon all-purpose flour
- 1/8 teaspoon fine sea salt or table salt
Optional toppings:
- 1/2 cup (120 ml) salted caramel sauce, warmed slightly
- 1/2 cup (120 ml) chocolate ganache or chocolate sauce
- 1 cup (150 g) fresh berries (strawberries, raspberries, blueberries)
- Whipped cream, for serving
- Shaved chocolate or chocolate curls, for garnish
Directions:
Step 1: Prepare the Pan
- Line a standard 12-cup muffin pan with paper cupcake liners. For easier removal, use sturdy, greaseproof liners.
- Lightly mist the liners with nonstick spray if desired; this helps prevent sticking to the paper.
- Preheat your oven to 350°F (175°C).
Step 2: Mixing Brownie Batter
- In a medium mixing bowl, whisk together the melted butter and granulated sugar until glossy and well combined, about 30 seconds.
- Add the eggs and vanilla extract, whisking until the mixture is thick, smooth, and slightly lightened in color, about 1 minute.
- Sift the cocoa powder, flour, baking powder, and salt directly into the bowl.
- Switch to a spatula and fold gently until no dry streaks remain. Do not overmix; stop as soon as it is combined.
- If using, fold in the chocolate chips or chunks just until evenly distributed.
Step 3: Cooking Brownie Bases
- Using a tablespoon or small cookie scoop, divide the brownie batter evenly among the 12 liners, filling 1/4 to 1/3 of the liner.
- With the back of a spoon or your fingers lightly moistened with water, gently spread and press the batter in an even layer in the bottom of each liner.
- Bake in the preheated oven for 8–10 minutes, just until the tops lose most of their shine and are starting to set at the edges but still look slightly underbaked in the center.
- Remove the pan from the oven and set it on a cooling rack while you prepare the cheesecake filling. Leave the oven on at 350°F (175°C).
Step 4: Preparing the Cheesecake Filling
- In a large bowl, add the softened cream cheese. Beat with a hand mixer on medium speed (or use a stand mixer with the paddle attachment) until smooth and creamy, about 1–2 minutes, scraping down the sides and bottom of the bowl.
- Add the sugar and beat on medium speed until the mixture is light and silky, about 1 minute.
- Add sour cream, vanilla, salt, and flour. Beat on low to medium-low speed just until incorporated.
- Add the eggs one at a time, mixing on low speed after each addition just until combined. Do not overbeat once the eggs are in; overmixing can cause more cracking.
- Scrape down the bowl and give the batter a gentle final mix by hand with a spatula to ensure everything is evenly combined.
Step 5: Assemble the Mini Cheesecakes
- Give the brownie bases a gentle press with the back of a spoon if they have puffed up too much, just to flatten slightly.
- Using a small ladle or scoop, divide the cheesecake mixture evenly over the partially baked brownie layers in each liner, filling almost to the top and leaving about 1/8 inch of space at the rim.
Step 6: Baking the Cheesecakes
- Tap the muffin pan gently on the counter a couple of times to release any large air bubbles.
- Bake at 350°F (175°C) for 15–18 minutes, or until the edges look set and the centers still have a slight jiggle when you gently shake the pan. Avoid overbaking; they will continue to set as they cool, and a small jiggle in the center is ideal.
Step 7: Initial Cooling
- Remove the pan to a wire rack and let the cheesecakes cool in the pan for about 30 minutes at room temperature. During this time, the centers may sink slightly; this is normal and creates a small well that’s perfect for toppings.
Step 8: Chill Thoroughly
- Once they have cooled to room temperature, transfer the muffin pan to the refrigerator. Chill for at least 3 hours, preferably 4–6 hours or overnight, until the cheesecakes are fully set and cold all the way through.
Step 9: Remove from Liners and Serve
- When fully chilled, gently peel away the paper liners from each cheesecake. If any cheesecake sticks to the liner, place them in the freezer for 15–20 minutes; the liners will come off more cleanly.
- Arrange on a serving platter.
Step 10: Add Toppings
- For chocolate topping: Spoon or drizzle a little warm chocolate ganache or chocolate sauce over the top of each mini cheesecake.
- For caramel topping: Add a spoonful of slightly warmed salted caramel into the center indentation of each cheesecake.
- For berry topping: Top with fresh berries. Optionally, glaze them lightly with warmed jam for shine.
- Add a swirl of whipped cream and a few chocolate shavings or curls if desired.
Storage:
- Store any leftover mini cheesecakes in an airtight container in the refrigerator for up to 4–5 days.
- For longer storage, freeze them (without whipped cream) on a tray until firm, then wrap individually and store in a freezer bag or container for up to 2 months. Thaw overnight in the refrigerator before serving.
How to Serve Brownie Bottom Mini Cheesecakes
These mini cheesecakes are perfect for entertaining! Serve them on a decorative platter with fresh fruits and sauces drizzled on top. They make a great dessert for family gatherings, holiday celebrations, or as a sweet treat after dinner. Feel free to mix and match the toppings according to everyone’s preferences for added fun!
How to Store Brownie Bottom Mini Cheesecakes
Keep your mini cheesecakes in a sealed container in the fridge for up to 5 days. For longer freshness, you can freeze them! Just make sure they are wrapped tightly to prevent freezer burn and thaw in the refrigerator when you’re ready to enjoy again.
Expert Tips for Perfect Brownie Bottom Mini Cheesecakes
- Room Temperature Ingredients: Ensure that your cream cheese and eggs are at room temperature for a smooth filling.
- Don’t Overmix: Overmixing the cheesecake batter can lead to cracks; mix just until combined.
- Baking Method: If possible, bake with a water bath to help maintain moisture and prevent cracking.
- Chill Longer for Best Results: Allowing them to chill overnight not only helps with set but enhances the flavors.
- Experiment with Flavors: Try adding flavored extracts or different toppings for unique twists!
Delicious Variations
- Chocolate Hazelnut: Add a spoonful of hazelnut spread to the cheesecake layer for a creamy, nutty flavor.
- Fruit Swirls: Swirl in pureed fruits like strawberry or raspberry before baking for a beautiful marbled effect.
- Mint Chocolate: Substitute peppermint extract for vanilla in the cheesecake mixture for a refreshing minty flavor.
Frequently Asked Questions
-
Can I use a different type of chocolate?
Yes! Dark or milk chocolate can be used depending on your taste preference. Just adjust the sweetness accordingly. -
What if I don’t have cupcake liners?
You can greased the muffin pan directly, but using liners helps with removing the cheesecakes easily. -
Can I make these in advance?
Absolutely! These mini cheesecakes are great for make-ahead desserts. Just prepare and chill them, adding toppings before serving. -
How do I know when the cheesecakes are done?
The edges should appear set while the center has a gentle jiggle—this indicates they will firm up as they cool. -
Can I freeze these cheesecakes?
Yes! They freeze well for up to 2 months. Just make sure to thaw them overnight in the refrigerator before serving.
Conclusion
Brownie Bottom Mini Cheesecakes are a delightful combination of fudgy brownie and creamy cheesecake that everyone will adore. Not only are they delicious, but they are also easy to make and customizable with your favorite toppings. So gather your ingredients, and let’s whip up a batch of these scrumptious treats that are sure to charm at any gathering! Enjoy every bite!