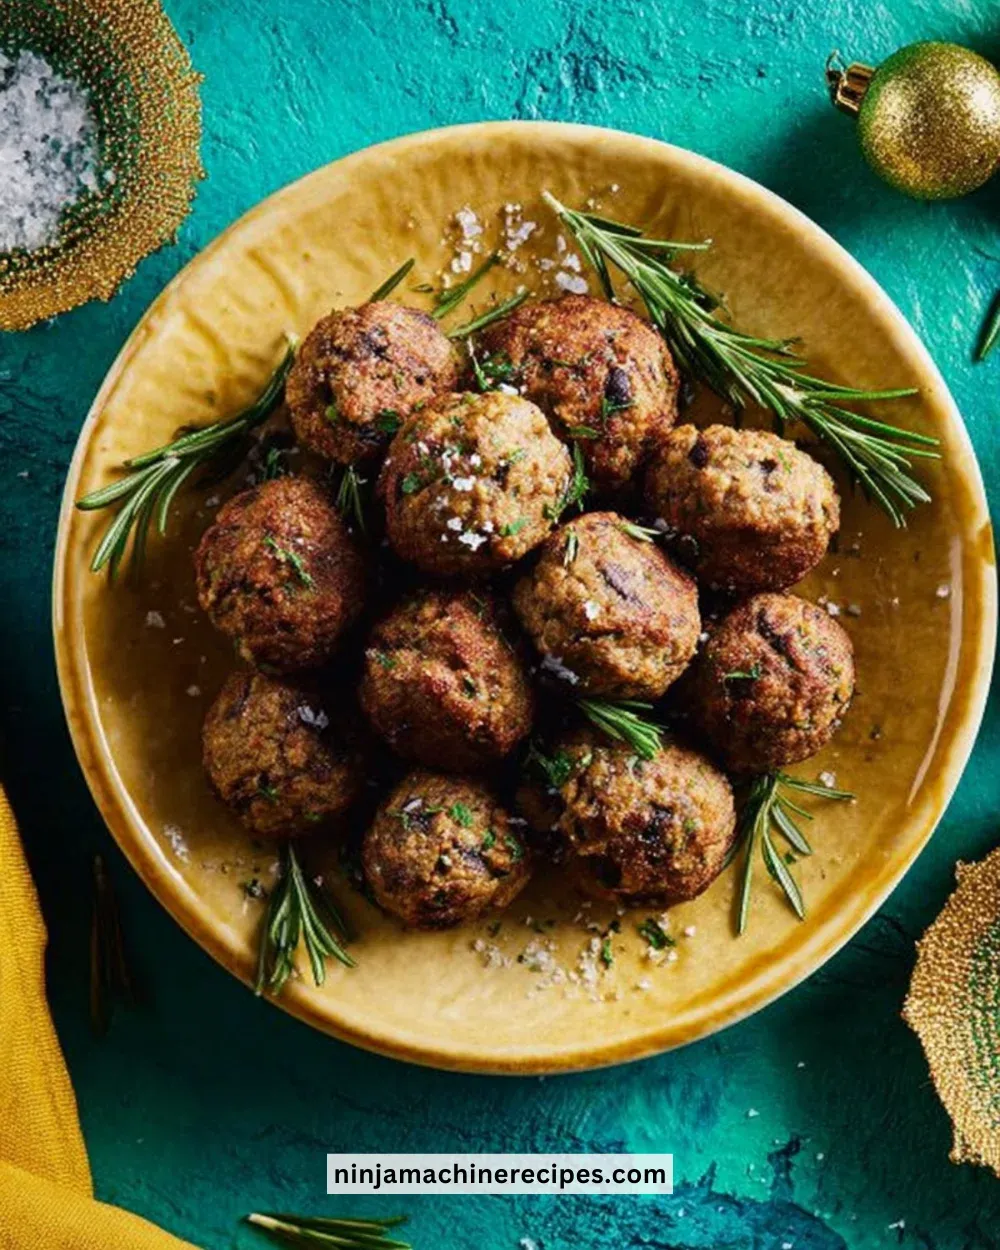
Air Fryer Mushroom and Chestnut Stuffing Balls are a delightful twist on traditional stuffing. These little bites are bursting with the rich, earthy flavors of mushrooms and sweet chestnuts, perfectly seasoned to create a dish that pairs wonderfully with your favorite holiday meals or any cozy dinner. The air fryer makes them wonderfully crispy on the outside while keeping the interior soft and flavorful. Let’s dive into this amazing recipe!
Recipe Information
- Prep Time: 15 minutes
- Cook Time: 12 minutes
- Total Time: 27 minutes
- Servings: 4
- Difficulty Level: Easy
Nutrition Information
- Calories per serving: 200
- Protein: 5g per serving
- Carbohydrates: 28g per serving
- Fat: 8g per serving
- Fiber: 4g per serving
- Sugar: 1g per serving
- Sodium: 300mg per serving
Why Make This Air Fryer Mushroom and Chestnut Stuffing Balls
These Air Fryer Mushroom and Chestnut Stuffing Balls are not just easy to prepare; they’re also incredibly versatile. Perfect for festive gatherings or simple weeknight dinners, they offer a delightful alternative to regular side dishes. They pack a nutritious punch, keeping you satisfied without weighing you down. Plus, they are vegetarian-friendly, making them an excellent choice for those looking to enjoy meat-free options.
How to Make Air Fryer Mushroom and Chestnut Stuffing Balls
## Ingredients:
- 8 ounces mushrooms, chopped
- 1 cup cooked chestnuts, chopped
- 1 cup breadcrumbs
- 1/2 cup vegetable broth
- 1 onion, diced
- 2 cloves garlic, minced
- 1 teaspoon dried thyme
- 1 teaspoon dried sage
- Salt and pepper to taste
- Olive oil spray
## Directions:
-
Step 1: Sautéing the Base
In a skillet, heat some olive oil over medium heat and sauté the onion and garlic until soft. This should take about 3-5 minutes. The aroma of onions and garlic cooking will fill your kitchen, creating a warm and inviting atmosphere.
-
Step 2: Cooking the Mushrooms
Add the chopped mushrooms to the skillet and cook until they release their moisture, about 5 minutes. The mushrooms will shrink down and begin to caramelize, adding depth to the flavor of the stuffing.
-
Step 3: Mixing the Ingredients
Stir in the chopped chestnuts, dried thyme, dried sage, salt, and pepper into the mushroom mixture. Cook for another couple of minutes until everything is well combined and fragrant.
-
Step 4: Combining and Forming Balls
In a bowl, combine the mushroom mixture with breadcrumbs and vegetable broth until well mixed and the mixture holds together. Form the mixture into balls with your hands. You should aim for about 12-16 balls, depending on the size you prefer.
-
Step 5: Air Frying
Preheat the air fryer to 375°F (190°C) and lightly spray the basket with olive oil. Place the stuffing balls in the basket without overcrowding them and spray lightly with more olive oil on top.
-
Step 6: Cooking Until Golden
Cook for 10-12 minutes until golden brown, shaking the basket halfway through for even cooking. Your kitchen will soon be filled with the irresistible scent of savory stuffing!
-
Step 7: Serving
Serve warm as a side dish or appetizer.
How to Serve Air Fryer Mushroom and Chestnut Stuffing Balls
These stuffing balls are incredibly versatile. Serve them alongside a hearty vegetable dish for a filling vegetarian meal, or pair them with roasted meats for a delightful holiday feast. They also make great appetizers for parties; simply provide a side of your favorite dipping sauce, like aioli or cranberry sauce.
How to Store Air Fryer Mushroom and Chestnut Stuffing Balls
Keep any leftovers in an airtight container in the refrigerator for up to 3 days. Reheat them in the air fryer or oven at 350°F (175°C) until warmed through. For longer storage, consider freezing them. Place the uncooked balls on a baking sheet to freeze individually, then transfer them to a freezer-safe bag. They can be cooked directly from frozen, just add a few extra minutes to the cook time.
Expert Tips for Perfect Air Fryer Mushroom and Chestnut Stuffing Balls
- Don’t Skip the Sautéing: Sautéing the onion and garlic not only enhances their flavors but also adds moisture to the mixture.
- Texture Matters: Ensure your breadcrumbs are finely ground for the best texture. If you want a crunchier bite, you could use panko breadcrumbs.
- Experiment with Herbs: Feel free to experiment with fresh herbs like parsley or rosemary for added flavor.
- Adjust for Moisture: Depending on how dry your breadcrumbs are, you may need a little more or less broth—add gradually until the mixture holds.
- Watch the Air Fryer: Keep an eye on them during cooking, as air fryer models can vary in cooking time.
Delicious Variations
- Nutty Alternative: Swap chestnuts for chopped walnuts or pecans for a different nutty flavor.
- Cheesy Addition: Mix in some shredded cheese, such as mozzarella or cheddar, for a cheesy stuffing ball.
- Spicy Kick: Add a pinch of red pepper flakes for a little heat.
- Veggie Boost: Incorporate finely diced spinach or kale into the mixture for added nutrients and flavor.
Frequently Asked Questions
- Can I use fresh chestnuts? Yes! Just ensure they are cooked and peeled before adding. Roasted chestnuts work beautifully in this recipe.
- What other herbs can I use? Feel free to mix in any herbs you enjoy! Rosemary, oregano, or basil would complement the flavors nicely.
- Can I make these ahead of time? Absolutely! You can prepare the mixture, form the balls, and refrigerate them a day in advance. Cook them just before serving.
- How can I ensure they don’t fall apart? Make sure to combine the ingredients well, and do not skip on the breadcrumbs. They act as a binding agent.
- Can I bake them instead of using an air fryer? Yes! Preheat your oven to 375°F (190°C) and bake for about 20-25 minutes or until golden brown.
Conclusion
These Air Fryer Mushroom and Chestnut Stuffing Balls are a delicious and easy way to enhance your meals with minimal effort. Their crispy exterior and soft, flavorful interior make them a perfect side dish or appetizer for any occasion. Don’t hesitate to try this recipe the next time you’re in the mood for something hearty and satisfying. Enjoy the delightful blend of flavors and the warm smiles they bring to your table!
