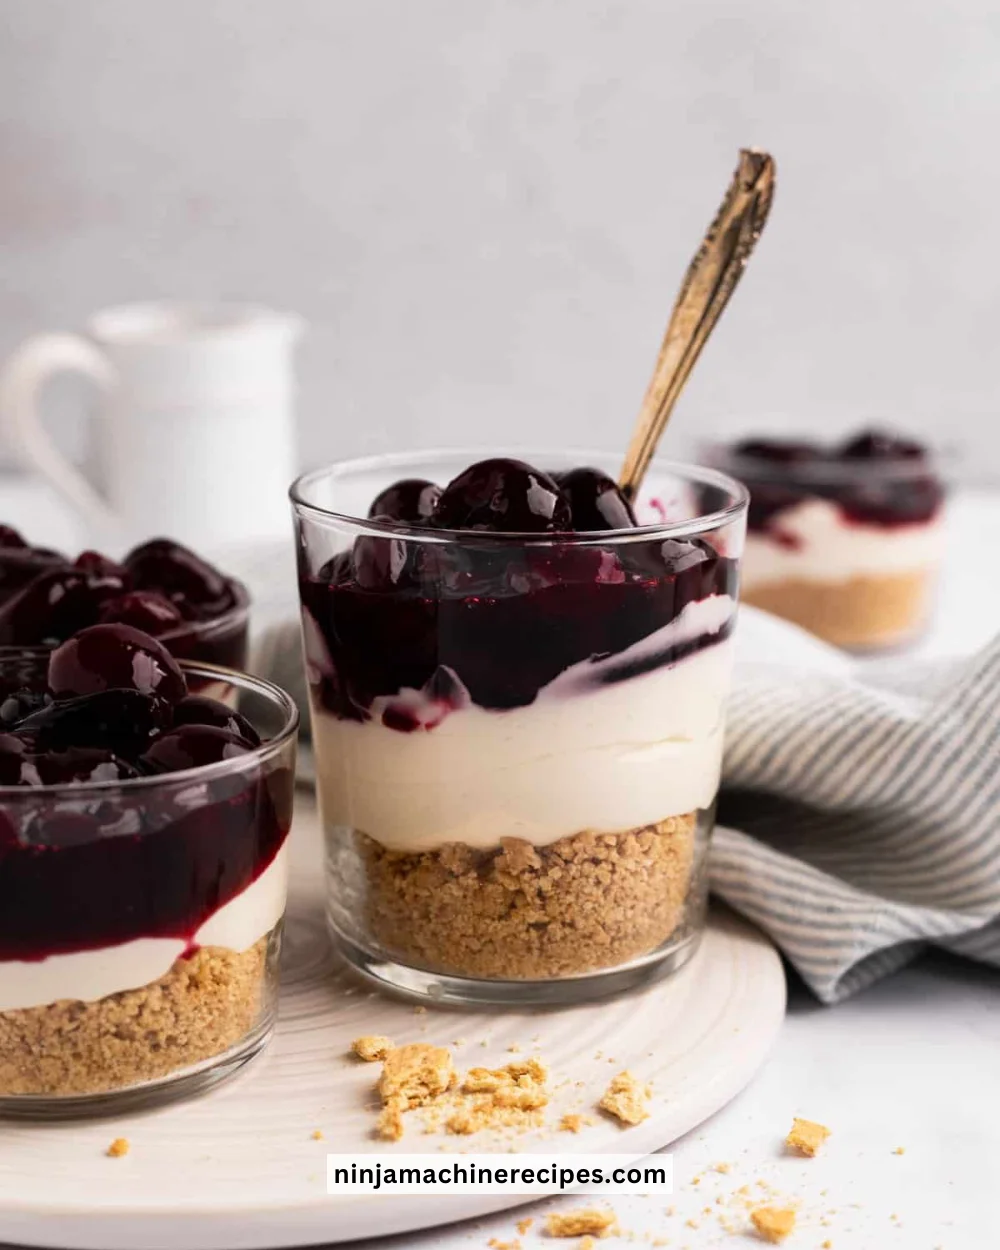
There’s something wonderfully nostalgic about a classic no-bake cherry cheesecake. I remember the first time I tasted it at a summer picnic with friends, the sun casting a warm glow over the table spread. Each bite was a harmonious blend of creamy cheesecake and vibrant cherries, balanced on a crunchy graham cracker crust. It felt like summer itself—sweet, refreshing, and utterly satisfying. As I absorbed the laughter and the joy that day, I knew then I’d have to recreate that delightful experience at home. And now, I’m excited to share my easy-to-follow recipe that will bring a dose of sweetness to your kitchen.
Recipe Timing
- Prep Duration: 20 minutes
- Active Cooking: None
- Total Duration: 4 hours 20 minutes (including refrigeration)
- Portion Size: Serves 8
- Complexity: Simple
Nutritional Recipe
- Calories per portion: Approximately 350
- Protein: 4 grams
- Carbs: 30 grams
- Fats: 25 grams
- Fiber: 1 gram
- Sugars: 15 grams
- Sodium: 200 mg
Why You’ll Love This No-Bake Cherry Cheesecake
This No-Bake Cherry Cheesecake is the perfect dessert for any occasion. It requires no oven time, making it a true go-to during the hot summer months when you want something sweet but don’t want to heat up the kitchen. The creamy filling is perfectly complemented by the tartness of the cherry pie filling, creating a delightful flavor profile. Most importantly, it’s so easy to whip up that anyone can feel like a pro in the kitchen, regardless of experience. Trust me, once you serve this charming dessert, it will quickly become a favorite among family and friends!
The Complete Cooking Journey
Let’s embark on this simple journey together. In just a few steps, you’ll create a beautiful cherry cheesecake that’s not only delicious but also a feast for the eyes.
Ingredients:
- 1 ½ cups graham cracker crumbs
- ½ cup unsalted butter, melted
- 2 cups cream cheese, softened
- 1 cup powdered sugar
- 1 teaspoon vanilla extract
- 1 cup heavy whipping cream
- 1 can cherry pie filling
Method:
Step 1: Prepare the Crust
In a mixing bowl, combine graham cracker crumbs and melted butter until the mixture resembles wet sand. Press the buttery crumbs evenly into the bottom of a 9-inch pie pan to create a firm crust. Once satisfied with your crust, place it in the refrigerator for 10 minutes to set.
Step 2: Mix the Cream Cheese Filling
In another mixing bowl, beat together the softened cream cheese, powdered sugar, and vanilla extract until smooth and creamy. This will be the luxurious filling that makes our cheesecake so special.
Step 3: Whip the Cream
In a separate bowl, whip the heavy cream until stiff peaks form. This fluffy addition will give your cheesecake a light and airy texture. Once whipped, gently fold the whipped cream into the cream cheese mixture until fully combined.
Step 4: Spread the Filling
Take the cheesecake filling and evenly spread it over the chilled graham cracker crust. Smooth out the top with a spatula to make it look as beautiful as possible.
Step 5: Add the Cherry Topping
Now comes the fun part! Open the can of cherry pie filling and spoon it over the cheesecake filling, creating a vibrant topping that adds a pop of color and tang.
Step 6: Chill Until Set
Cover the cheesecake with plastic wrap and refrigerate it for at least 4 hours, or overnight if you’re planning ahead. This sets the cheesecake perfectly, allowing each slice to hold its shape when served.
Serving Suggestions & Pairings
This no-bake cherry cheesecake is delightful on its own, but you can elevate the experience by serving it with a dollop of freshly whipped cream, a sprinkle of graham cracker crumbs, or even a drizzle of chocolate sauce. It pairs wonderfully with a cup of coffee or tea, making it a great choice for brunch or as a light dessert after dinner.
Storage & Leftovers Guide
If you’re lucky enough to have leftovers (which is often not the case!), simply cover the cheesecake and store it in the refrigerator for up to 3 days. If you want to freeze it, slice it first, wrap each piece in plastic wrap, and store in an airtight container for up to a month. Just thaw in the fridge before serving.
Kitchen Wisdom & Success Tips
- Room Temperature Ingredients: Make sure your cream cheese is at room temperature for easy mixing and a smoother texture.
- Heavy Cream Peaks: Don’t over-whip the cream; you want stiff peaks, but not dry lumps.
- Chill Time: Patience is key! Allowing the cheesecake to set for at least 4 hours is crucial for the right texture.
Flavor Variations & Adaptations
Feeling adventurous? Try switching up the topping! Use fresh strawberries, blueberries, or even diced peaches for a fruity twist. You can also fold in a bit of lemon zest to the cream cheese mixture for a zesty kick.
Reader Questions & Solutions
-
Q: Can I use low-fat cream cheese?
A: Yes, you can, but it may slightly alter the texture. The cheesecake might not be as rich and creamy. -
Q: What if I don’t have graham crackers?
A: Use crushed Oreos or digestive biscuits for a different yet delicious crust! -
Q: How can I make this gluten-free?
A: Use gluten-free graham crackers or any gluten-free cookie alternative for the crust. -
Q: Can I freeze the cheesecake?
A: Yes, but it’s best to eat it fresh. If you freeze it, cover it tightly to prevent freezer burn. -
Q: What if the cheesecake doesn’t set?
A: Make sure you’ve chilled it long enough! If not, using a bit of gelatin in the filling could help it hold together better next time.
Wrapping Up
There you have it—a delicious, easy-to-make No-Bake Cherry Cheesecake that brings joy to any table! This dessert is perfect for sharing with loved ones or enjoying on your own as a sweet reward after a long day. Remember, the best recipes come from the heart, and this one is surely a reflection of warmth, joy, and nostalgia. So grab your ingredients, roll up your sleeves, and embark on this delightful cooking adventure today! Happy baking!
Print
No-Bake Cherry Cheesecake
- Total Time: 260 minutes
- Yield: 8 servings 1x
- Diet: Vegetarian
Description
A delightful and easy-to-make no-bake cherry cheesecake that brings the flavors of summer to your table with a creamy filling, vibrant cherry topping, and crunchy graham cracker crust.
Ingredients
- 1 ½ cups graham cracker crumbs
- ½ cup unsalted butter, melted
- 2 cups cream cheese, softened
- 1 cup powdered sugar
- 1 teaspoon vanilla extract
- 1 cup heavy whipping cream
- 1 can cherry pie filling
Instructions
- In a mixing bowl, combine graham cracker crumbs and melted butter until resembling wet sand. Press into a 9-inch pie pan to form a crust and refrigerate for 10 minutes to set.
- In another bowl, beat together softened cream cheese, powdered sugar, and vanilla extract until smooth.
- Whip the heavy cream until stiff peaks form and gently fold into the cream cheese mixture.
- Spread the cheesecake filling evenly over the chilled crust.
- Spoon cherry pie filling over the cheesecake filling.
- Cover with plastic wrap and refrigerate for at least 4 hours to set.
Notes
For best results, ensure cream cheese is at room temperature. Serve with a dollop of whipped cream or a drizzle of chocolate sauce.
- Prep Time: 20 minutes
- Cook Time: 0 minutes
- Category: Dessert
- Method: No-Bake
- Cuisine: American
Nutrition
- Serving Size: 1 slice
- Calories: 350
- Sugar: 15g
- Sodium: 200mg
- Fat: 25g
- Saturated Fat: 15g
- Unsaturated Fat: 10g
- Trans Fat: 0g
- Carbohydrates: 30g
- Fiber: 1g
- Protein: 4g
- Cholesterol: 50mg